
Are cob ovens better than regular ovens?
A Boom DIY: How to build a Cob Oven:
Do you like pizza? Of course you do, most everyone loves pizza and one of the best ways to make an amazing pizza is with a wood fired pizza oven. Wood fired ovens are able to get much hotter than a standard electric or gas oven. When your oven can get up to 700-800 degrees F you can cook pizzas with epic bubbles in under 3 minutes. Once you make pizza this way you will never want to go out to get pizza again. When I had a desire for making my own pizza in our back yard, after doing a quick google search i realized that this hobby was far too expensive for the average person. For larger outdoor pizza ovens they cost in the range of $2000-$5000. These are fixed ovens meaning that they are large enough that when they are set in place they are not easily moved. They are larger meaning you can use larger size pieces of wood and have more oven floor space to cook on. There are now smaller, and less expensive options to choose from which still will cost at least $600. They may give you the ability to move it around but you also will have to use smaller pieces of wood and can usually only cook on pizza at a time. These smaller ovens are also not very tall, as they are made with the purpose of cooking pizza at high temperature, so you may not be able to fit items like a Dutch oven in the oven which limits what you will be able to cook.


With this in mind, I looked for other ways of how to make your own pizza ovens. Some are built with masterfully laid bricks giving a beautiful final product but this requires a large amount of bricks and mortar to complete and the skill of brick laying I was trying to eliminate the use of concrete as much as possible in this project so I decided to go the route of making our pizza oven a COB Oven!
What’s cob you ask? Cob is a building method/material still used today by many people around the world, where the soil under your feet can be mixed with a ratio clay, sand, and water to give a product as strong as rock and as cheap as dirt. Cob is malleable when wet so you can build whatever your hands decide to create, and when it dries, the substrate feels more like concrete with a majority of the substrate being made of fine rocks and sand as the clay structure binds the material together. If you want to know more about cob houses and building be sure to check out out other blog on cob. The possibilities are endless, from homes, to ovens, benches, and fences, cob is a sustainable option and will last centuries if built and treated properly. The oldest standing cob house is over 10,000 years old!
Not only can you build a cob oven by hand, you can sculpt it into any shape or design you like as long as you follow a couple basic principles. When it comes to building cob ovens, most people, as well as myself, refer to Kiko Denzer’s book “How to Build a Cob Oven” which is more or less the Bible for this specific topic. This is what I referred to throughout the building process and gave me specific directions throughout the entire build. That said, i highly suggest getting a copy of this book for yourself but when diving into new waters, some people may be excited about learning the material but afraid of executing the work or messing up. What I have learned is that you can learn a lot from reading and planning prior to executing a project but there comes a point where you need to put down the book and get to work. Researching a topic should give you a basic understanding of what you goal is but you can never learn Evey thing about a topic without getting your hand dirty. All I’m saying is dont be afraid to try something new or even mess up because the satisfaction of accomplishing something you want it always worth it!
Like I said before, if you follow a couple guidelines you will be cooking in no time, no pun intended. The basic parts of the oven are the foundation on which the oven sits, the oven floor, and the cob mass itself which consists of a few different layers which I will mention.
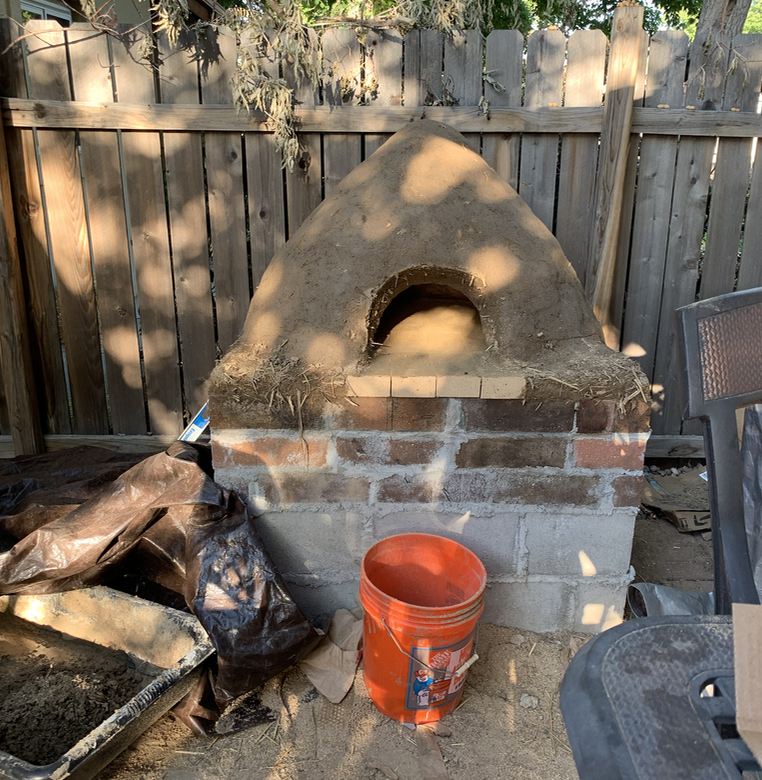
Foundation/Base:
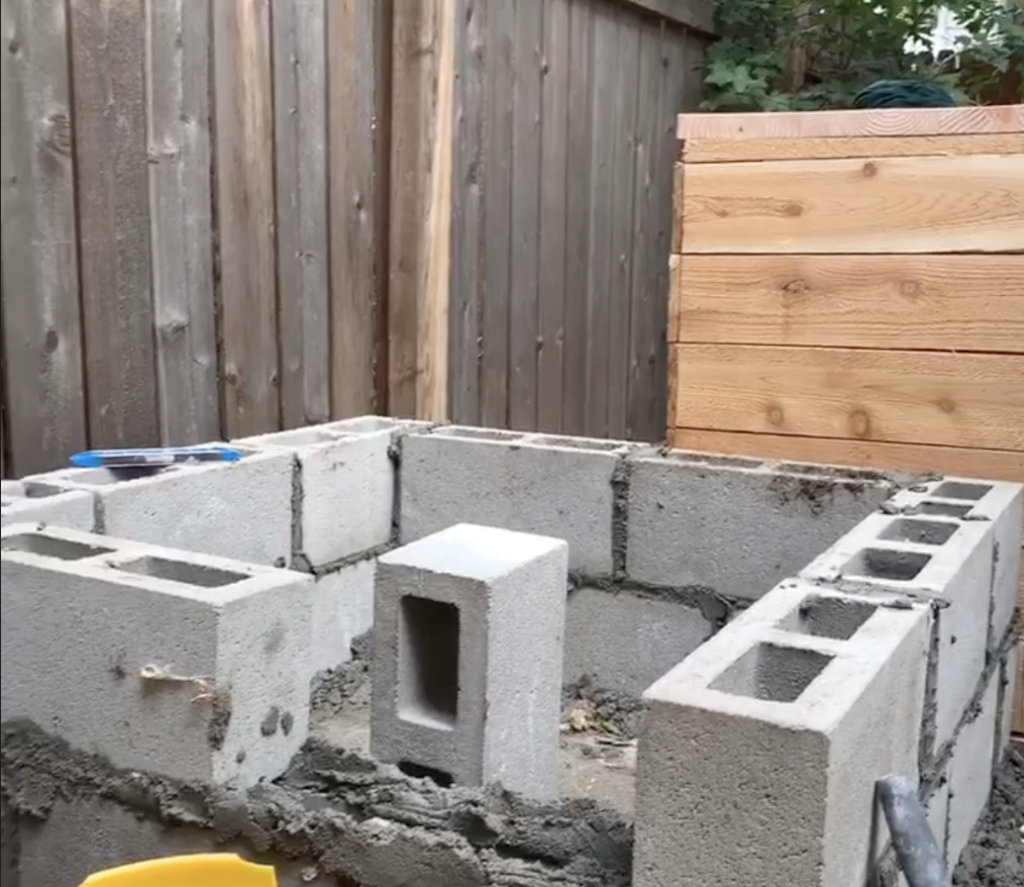
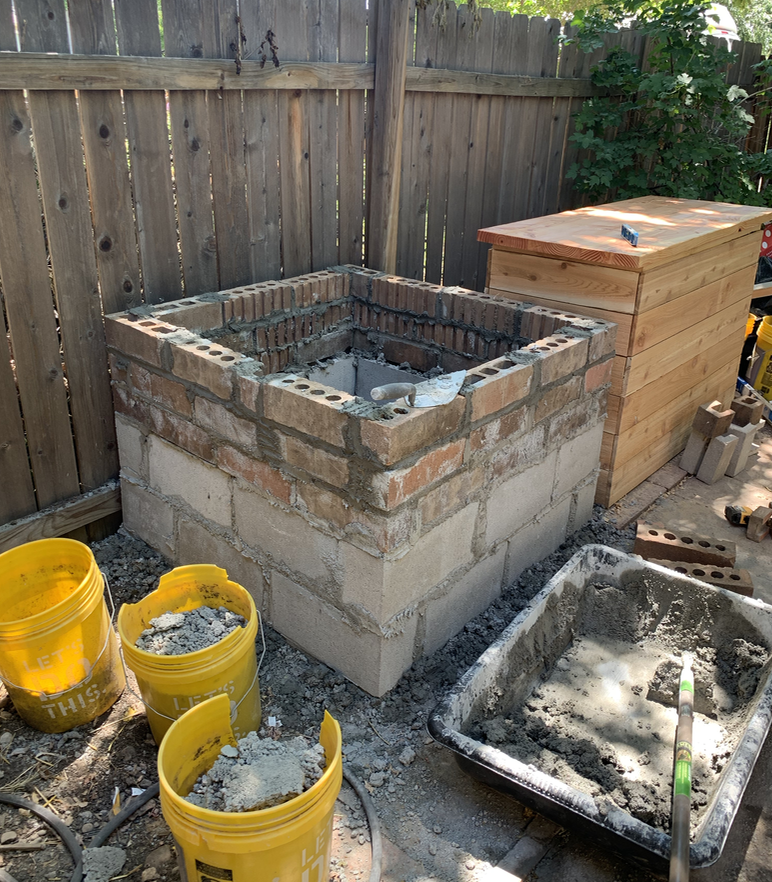
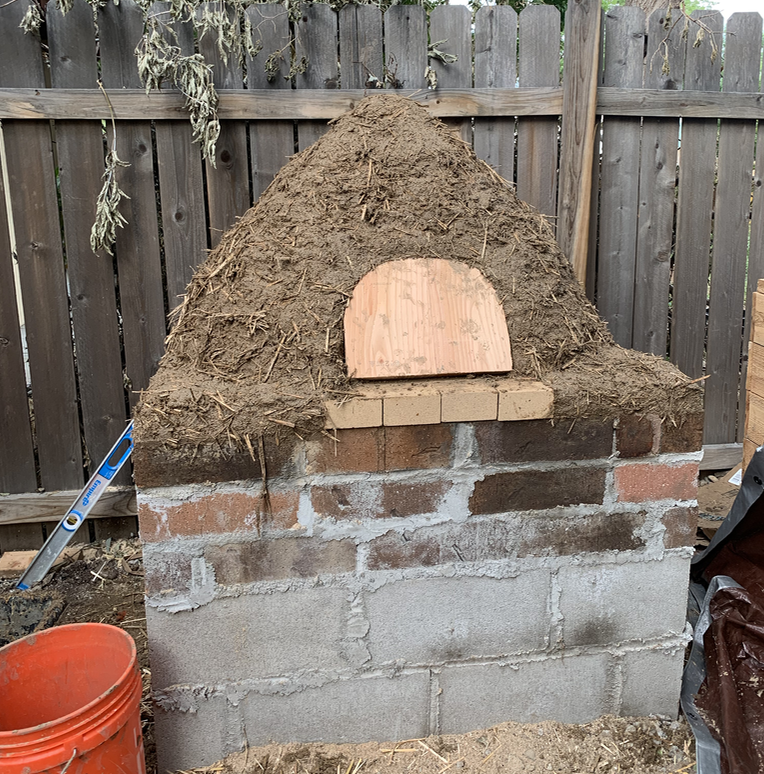
If you haven’t noticed, soil is very heavy, so based on the size of the oven you want to construct you need a very sturdy base to support it. Your foundation can be built using a few different materials but I suggest using something like stone, brick, cinder blocks, or more cob. These items are cheap, easy to find, and relatively strong compared to lumber. Cob is an option and is strong enough for the foundation but not as weatherproof as the other options as it doesn’t include Portland cement. I had a few cinderblocks hanging living in my backyard but this wasnt enough for the entire base. I searched Craigslist and found a bunch of used bricks which was used to complete my foundation that worked out just fine. My inside dimensions of my oven is basically 30” wide on the interior and the walls are 8” thick adding another 16” so my foundation is 48” wide. You can build a square or circle foundation but i chose to make it simple as possible for me as I’m not experienced with laying brick.
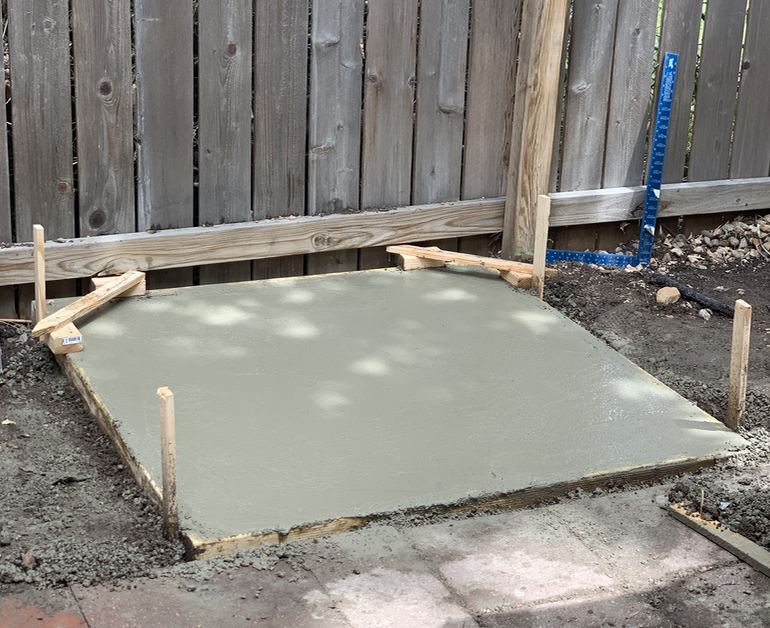
The oven base itself needs a solid foundation to sit on as the excessive weight on the bare soil will sink or shift potentially rendering you oven severely cracked and unusable over time. For the foundation you have two options. Either dig a hole the width of the oven base and 18-24” deep and fill it wilI gravel which will give you solid pad on which to build your foundation or make a 3-4” thick concrete slab for it to sit on. I chose the latter option as i wasn’t sure about locations of buried water and electrical lines so i avoided digging excessive amounts for my project.
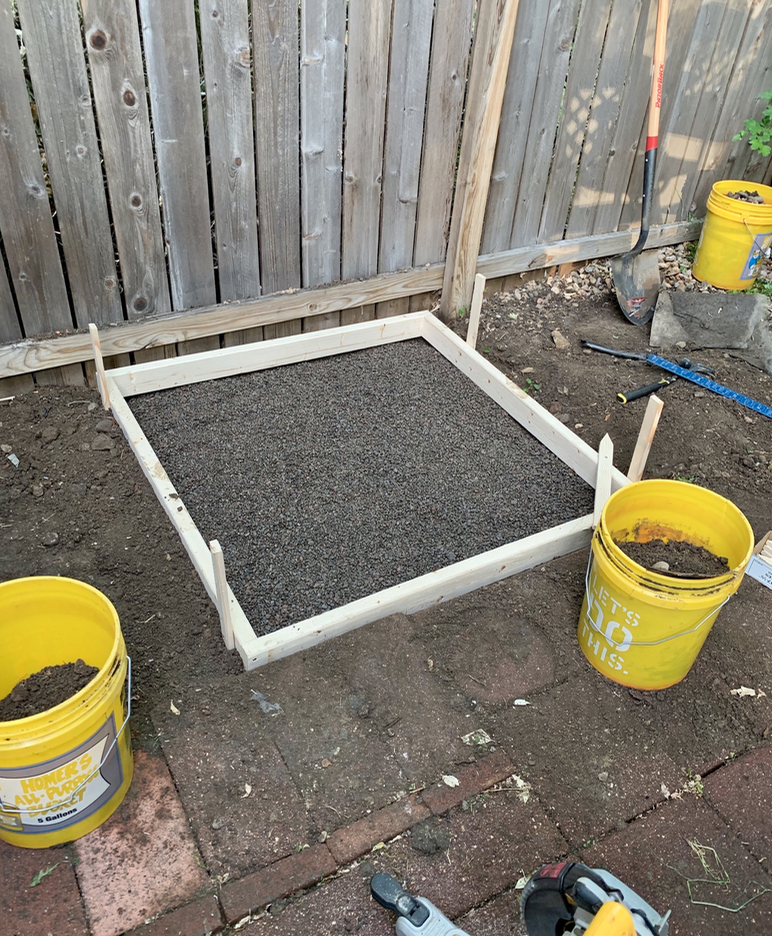
Once I poured the foundation pad I gave it a few days to dry and started work on building the base. I used about 8-10 60lb bags of mortar in total building the foundation with the free bricks i reclaimed from Craigslist. The base of your oven can be as high as you want but it should be comfortable height for you to learn over and work in the oven once its complete. My base is about 36” tall and about waist height. The base is just the exterior portion as the internal void space will be filled with gravel, rubble, broken concrete etc. The space is filled to help overall strength, and efficiency of the oven. Fill the base of the oven up until you are about 6-8” from the top of the foundation. At this point you will fill the remaining space with cob leaving about a 1-2” from the top lip of the foundation. This layer will introduce you to cob and you can get an idea of how the material acts and what ratio you should be looking for. This cob layer will help hold heat in the floor of the oven when it is in use increasing its efficiency. The last 1-2” will be filled with masons sand and leveled so your fire bricks, which is your oven floor, has a level place to sit.
Making Cob:
In order to make cob you need sand, clay, and water. In general all soils have a mixture of these two things including some silt and other organic materials. If you chose to dig a large hole and fill it with gravel for your foundation then you most likely have a large pile of dirt sitting nearby. If you did what i did and poured a concrete pad, I didn’t have much dirt. I went to a local landscape supply yard where I purchased a half yard of “fill dirt” for about $6. Fill dirt is what you should look for as it is basically subsoil which has clay in it and is used in construction for leveling and grading areas. Make sure you dont buy something that says soil as it wont have enough clay in it and too much organic material. Once you have your soil its time to make some test bricks.
Test Bricks and Jar Test: the purpose of the test bricks is to test different ratios for the best ratio of sand to soil. This will always vary because the soil you use each time will be different and thus the ratios of sand and soil will differ. If you have a ratios that has too much clay, it will be easy to form but when it dries will form large structural cracks. Think of a dry desert ground. What you are looking for is a finished product with basically no cracks. This is achieved by getting a mixture of about 70-75% sand and 25-30% clay. This means that the majority of the structure is sand and the small portion of clay basically binds it together.
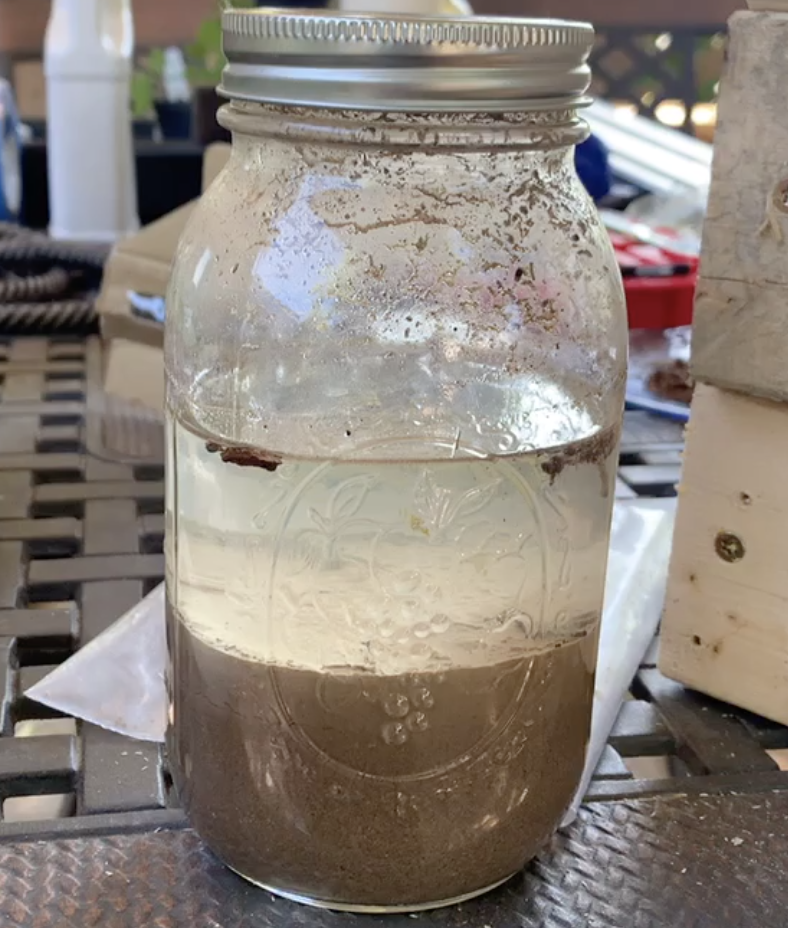
In order to get an idea of what proportions of clay and sand your soil has, you can use the Jar Test. Simply get a jar and fill with about 1/3 soil you will use. Crush up any larger pieces and fill the jar with water up to the top and put the lid on and vigorously shake the jar distributing the soil throughout the water. Shake for about 45 seconds and set the jar down and watch as the material settles. The first to sink to the bottom is the sand. This should happen within the first 1 minute. Use a marker and draw a line where this sand material has settled. The jar will still be hazy and could take up to 24 hours to completely settle. What’s left on top of the sand layer will be the clay layer. Measure the height of each layer and divide giving you a basic percentage of what your soil ratio is. based on the results of the jar test, you should have an idea of how much sand or soil you will be using in the mixture. The Brick test will further clarify the ratios you will use.
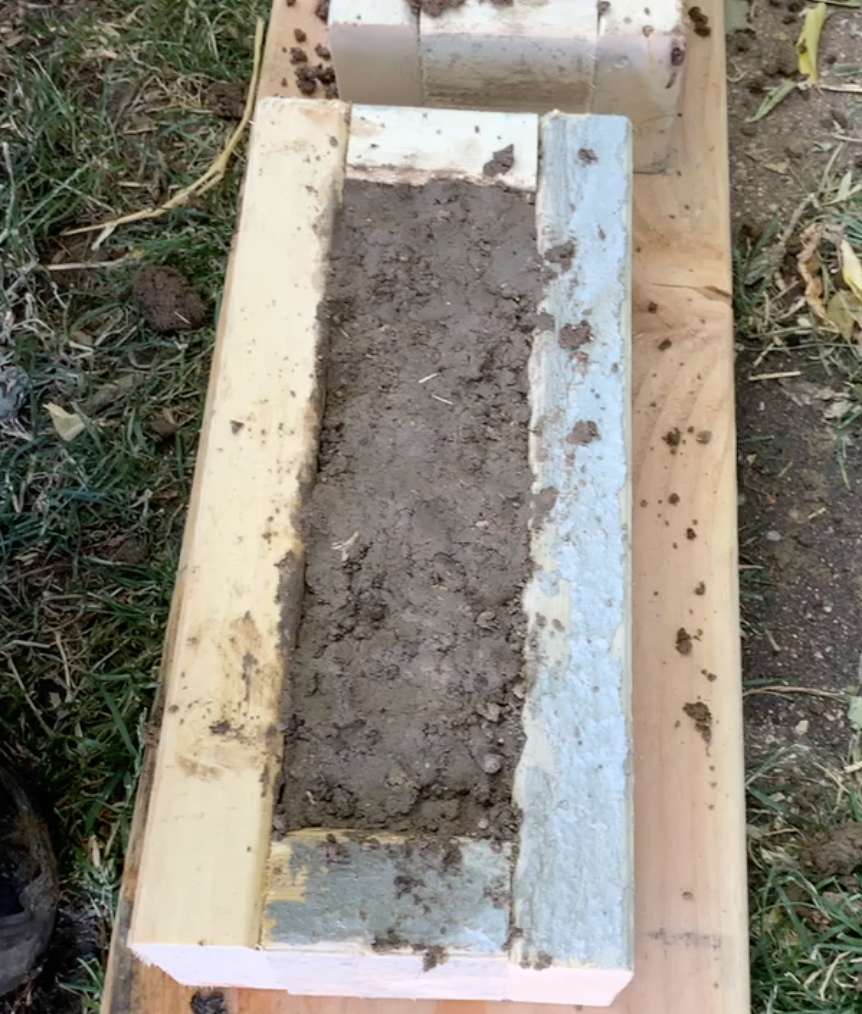
When making you test bricks, use 2×4’s and make three test brick boxes measuring 3”x10”. These molds will hold three different mixtures of cob for you to test. One bricks should be 100% soil. The second brick should have 50% sand and 50% soil. Your third brick should have a ration of 2:1 sand to soil. My perfect ratio was 2:1 sand to soil. Leave the bricks somewhere to dry for a few days before making and decisions. When analyzing your bricks you are looking for shrinkage, cracks ands density. If the brick is pulling away from the outside of the brick mold, this is a sign their is too much clay material which is shrinking when drying out. This is a sign it needs more sand. Your brick test should indicate how your materials will look and feel when it dries. You are looking for minimal cracks which indicates there is enough clay holding things together but enough sand to hold form and not crack when dry. If you found a good ratio to use you can move on to the next step. If all your mixtures still show cracks or issues, then make a couple more test bricks with higher ratios of sand like 3:1 or 4:1 sand to soil.
Oven floor:
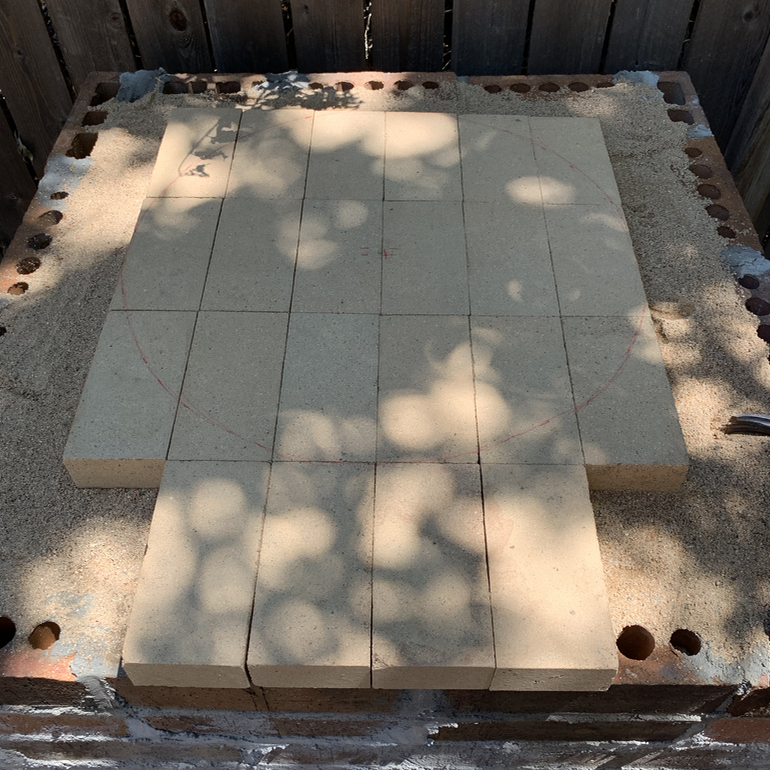
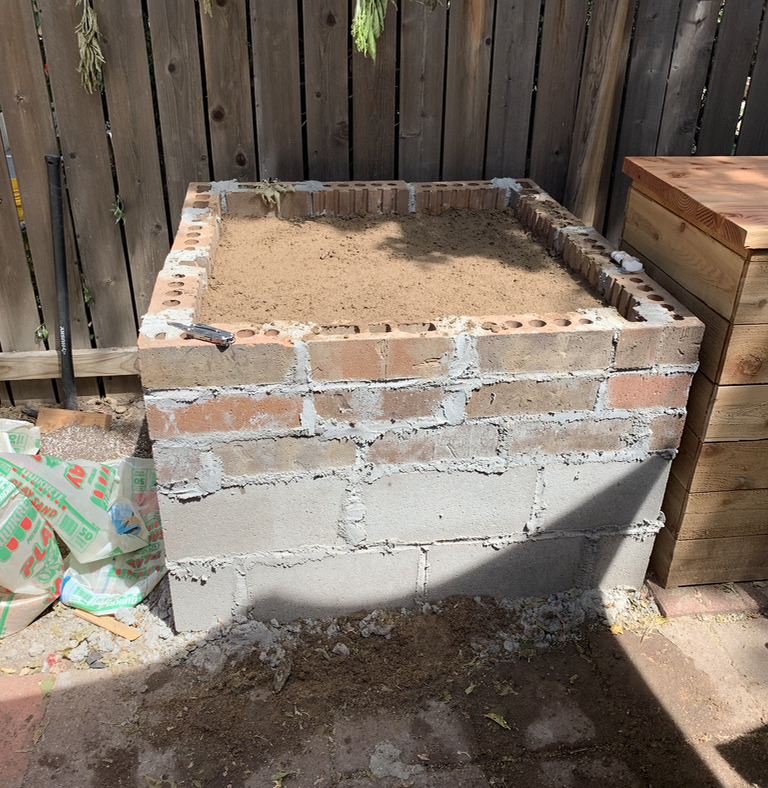
At this point you should have an oven foundation and test bricks showing what ratio you will use for your cob mixture during the build. Next you are going to build the oven floor which is composed of bricks specifically made to take high temperatures. Theres are used in ovens or clay kilns for firing up beyond 1000 degrees Fahrenheit. This was the most difficult thing to find for the build. I needed 23 bricks for my oven that was 30”. I found them at a landscape supply yard but also check any local pottery shops if you have any and cant find them. Make sure you don’t cut corners and use regular bricks as they can not hold up to consistent high-temperatures and will eventually breaks and leave you with an oven without a floor to bake on.
To lay your bricks, first pour masons sand to fill the last couple inches of your oven base and you can place your bricks on top of that. Refer to the book and our pics on how to place your bricks for the floor but it will take some trial and error of how exactly you will want your bricks to line up so take time and try as many times as you need. Once you have a good feeling about your floor layout you can remove the bricks and place them as level as possible, trying to eliminate any raised corners. You can use a soft mallet and gently tamp bricks in order for them to settle or level out. When placing the bricks next to each other, use the kiss technique where you placate next bricks a lightly touch it to the brick you are laying it next to and drop it down into place careful not to distribute the sand underneath it. The smoother and more level your floor, the more easily you can clean and cook in your oven without cracks or corners catching food or debris. Once you have completed your oven floor, step back and see the progress you have made as your oven is taking shape. Next its time to make good ole sand castle.
Oven Build: Sand Castle
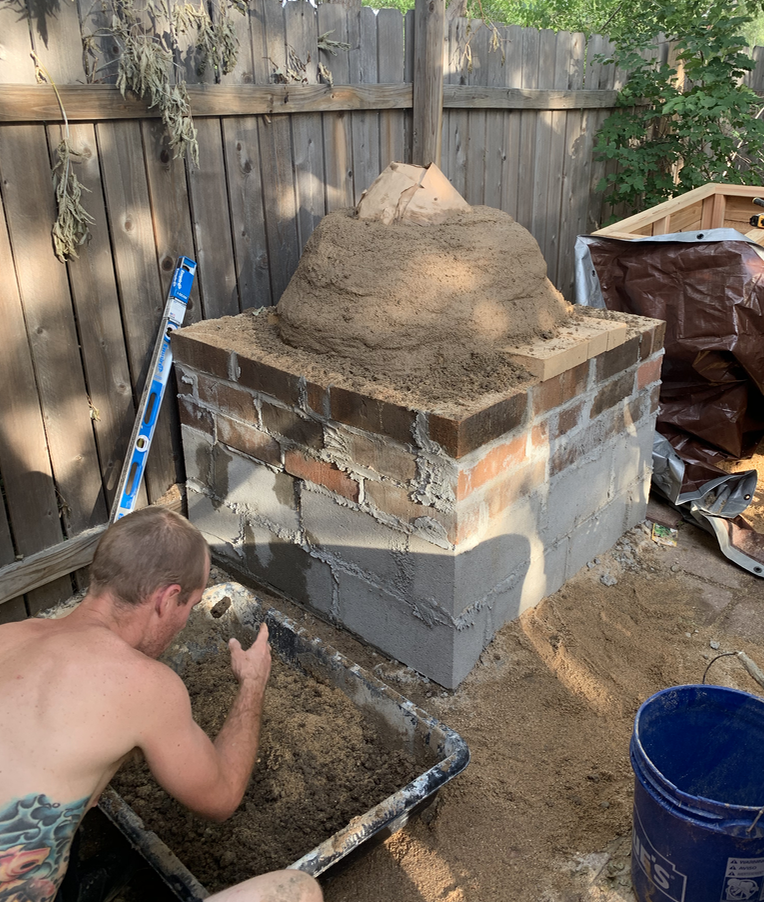
you have made it to the point of no return. You have large permanent foundation in your yard and its time to build your oven. Based on the size you chose for your oven, you will sketch a circle that will be the inside diameter of your oven. My oven was 30” so I had a point in the center of the oven floor and used a 15” piece of string to create a 30” circle around my floor. If your circle doesn’t line up completely on the bricks or if your bricks need fine tuning, now is the time before things get more complicated to fix after the fact.

When you feel comfortable with your layout, you are going to build your sand castle. Based on the dimensions listed in the book you will know how large the width and height your oven has to be as well as the width and the height of the door you will make in your oven. These dimensions are important in the ability of the oven to works properly since there is no flu creating the normal draft that is essential for most ovens to burn properly. My 30” oven is 16” tall inside. What you are going to do is build a sand castle to the size of your ovens internal cooking space and you will form your cob layers over that giving you the form you need to build the cob without collapsing on itself.
When building your sand castle cut a piece of wood to stick to the height of your oven so you know how tall to build. Using angular masons sand, wet it down and start you castle by using both hands and forming your circle following your makes made earlier. Once you have a circle place your stick for height reference in the middle start filling in the center Keeping your sand from drying out and continuing to form your castles as round and as even as possible. If sand collapses, done fret, just try again. If you are using angular sand and keeping it wet, you should have your interior castle build within an hour or two.
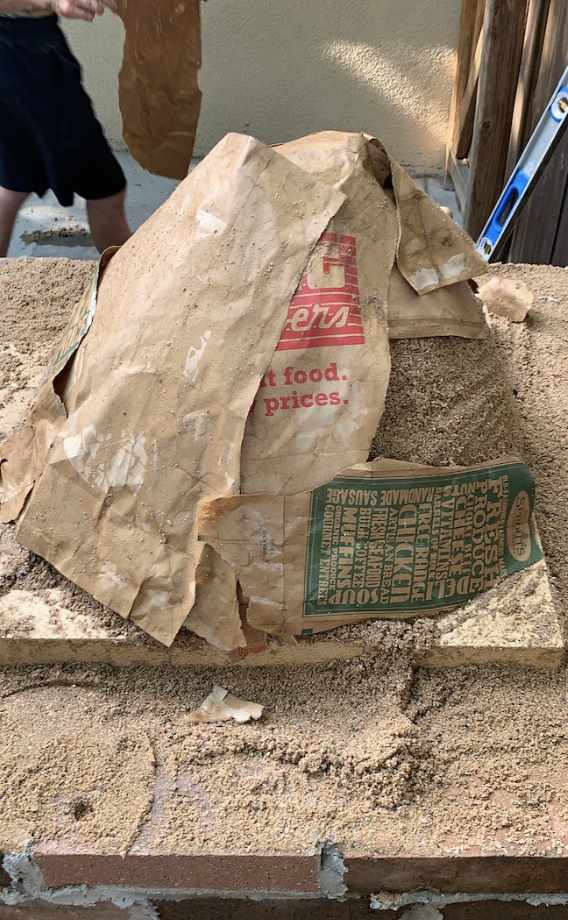
When you have completed your sand castle, grab some old news paper or any other paper, and wet it down and place it on top of your sand castle careful not to break it apart. The Paper will be crucial later when digging out your oven and knowing where to stop. Now i should have mentioned this earlier, but the day when you plan on doing the sand castle, you should have already done your test bricks and you should be ready to cob the same day as well. You may have to do the two layers different days based on how humid or dry your area is and how quickly the cob can dry.
Building Your cob oven:
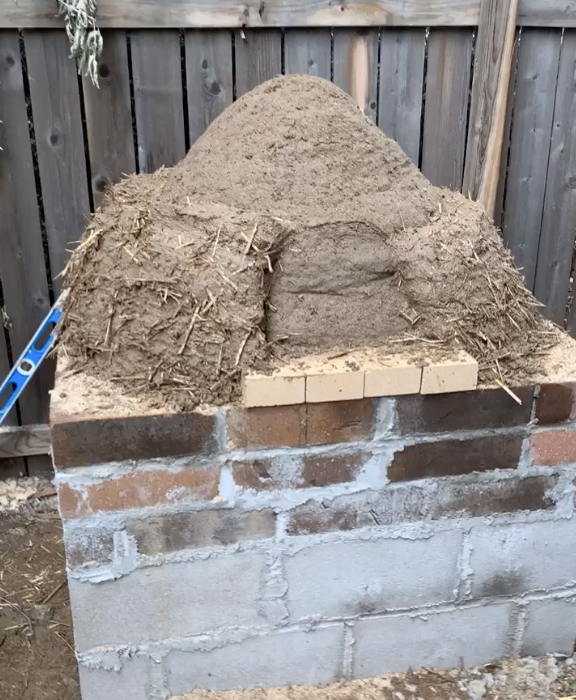
Your sand castle is formed and ready for cob. The Cob oven will have three layers, but two main layers, a thermal layer and an insulation layer. The first layer you make will be the thermal layer which is just made up of your cob mixture you have settled on. TIP:When making the cob, you should be able to form it into a ball and if you shake it lightly or drop it, it should keep its shape. Each layer should be at least 3-4” thick. Start anywhere around the sand castle and plop your cob ball on the base and use one hand to press downwards and your outside hand for pressing into the oven so all your cob doesn’t just fall out the side. It will take a little getting used to but cob is very forgiving and you can always try again if its not working out. If your mix seems too wet you can let it sit out exposed for 30 ,minutes to an hour for it to dry out some and then try to use it again. You will continue to make your cob balls and work your way around the sander castle until you have reached the top and completely enclosed the castle underneath. Based on your weather and your cob, you may have to wait a day or two for the cob to dry before adding your second layer or you could start your insulation layer the same day. If you add too much to fast, you will notice the cob wanting to sag or fall from its position it was placed in. Give it time to dry and come back.
Insulation layer:
For your second layer, you will be adding a layer of insulation. The first layer will store heat as it warms up and the second layer insulates the thermal layer keeping the heat in the oven for longer and giving you the ability to cook food overnight in your oven without added wood or heat. For your insulation layer you are making a modified form of cob by adding straw. There are other options for insulation but to me straw is the most common. Other options are wood shavings, perlite, or hemp. The straw acts as both insulation with adding small pockets of air within the cob while also adding tensile strength to the oven giving it more overall strength and stability against large cracks.
When making your cob, you are looking for cob consistency while also adding as much straw as the mix will take. The more straw the better. You will probably add more water as the straw will be dry and soak up moisture from the cob mixture. You should be able to form a ball and it should still be workable by hand. At this point you will repeat the same process as the first layer and cob around the thermal layer. Moisture will help bonding between layers so if your previous layer is dry, mist it with water prior to adding the second layer and this will help bind the two together. Continue until you get all the way to the top and you can smooth out any irregularities using simple tools like a plastic circular lid. They can be used to smooth out surfaces during any process of build cob or making finishing plasters. Step back and look at what you have created!! But there are a few more steps before you can start baking in your oven.
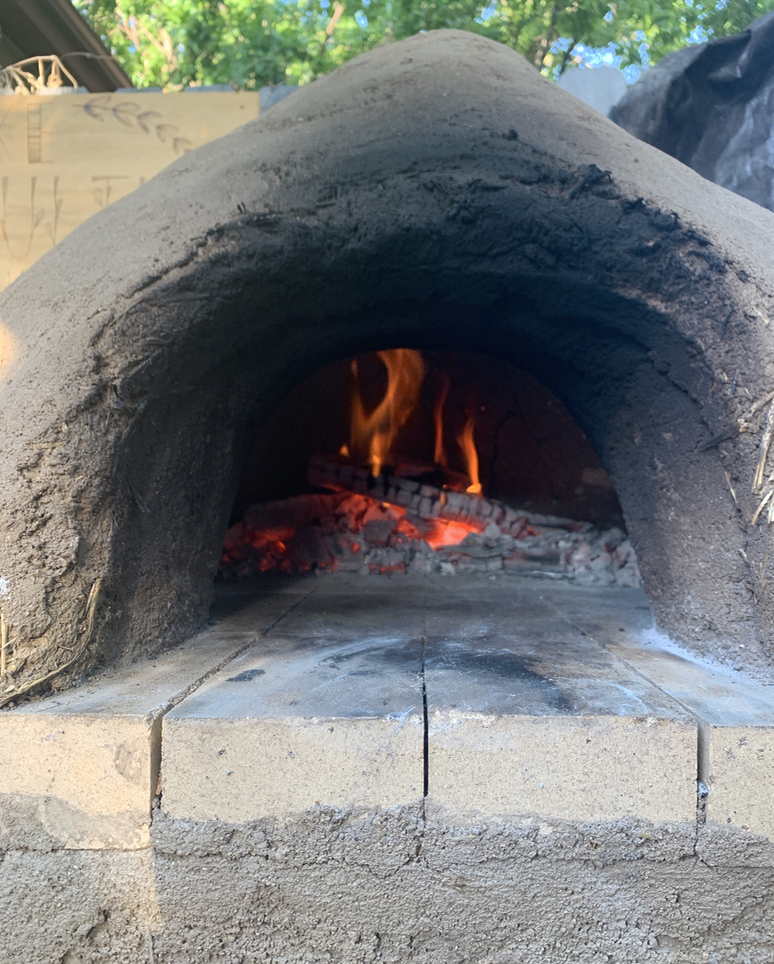
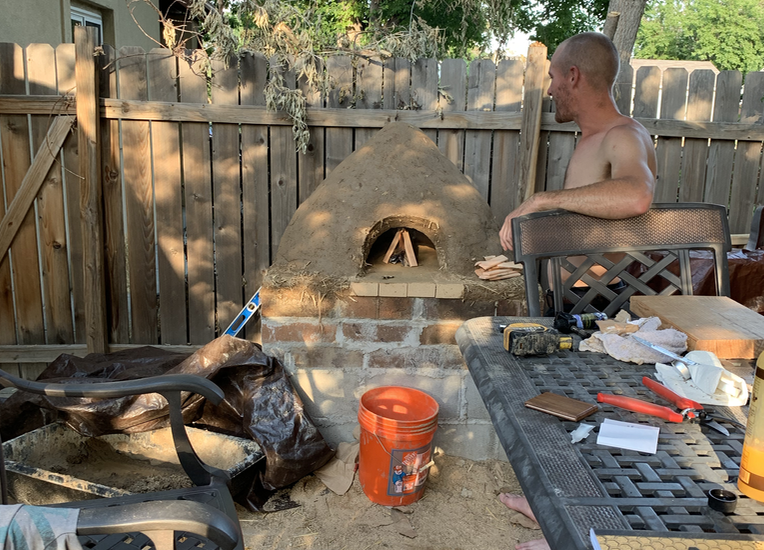
At this point, your oven has no door or door opening. Your oven door is something that can be placed over the opening when the fire is no longer lit and you are storing heat to bake with. The oven door is something you can make beforehand with the dimensions listed in the book based on the size of your oven. My door is about 13” wide and 10 1/2” tall with a simple handle made of another 2×4 I cut. If your door is made ahead of time, it also make a convenient template for when you cut out your door opening. TIP: Resist the temptation of cutting you door opening right away because it needs some time to dry. If the cob is still too wet, it will collapse once you cut out the door area. Your cob should feel pretty solid but still soft enough to cut into with a knife. If you wait too long it’s not a big deal but it will be more difficult to cut out your door opening.
When creating the opening, use a template or your door if you already made it and trace around it on the oven where it should be placed. Use a knife or garden hand shovel, or something to start breaking out the cob within your etched line of your oven opening. Try to create a smooth line along where your door sits to create a nice seal when it’s in place. You can also create a better seal later when adding a thin finish coat of Cob which you can form around the door making it fit perfectly in place. Continue digging out until you get to your paper layer you placed over your sand castle. At this point you know you have gone far enough. If you oven seems dry enough you can continue forward and start removing the sand castle inside. For me this was one of the most exciting and nerve wrecking parts because I was getting to see my oven near finished form but didn’t know if it would collapse on itself because at this point your oven has a lot of mass and therefore weight around it. Remove all the sand on the inside until you fully see your layer of paper. You can try to pull it off but if it pulls off pieces of cob then leave it in place and it will burn off during your first fire.
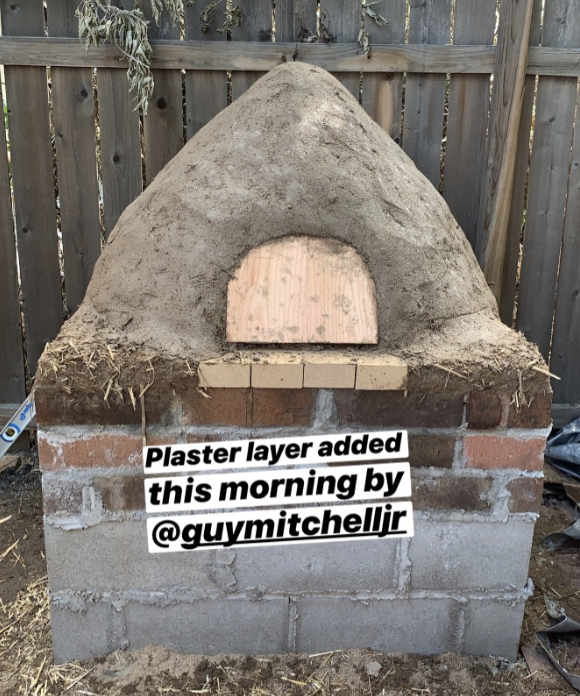
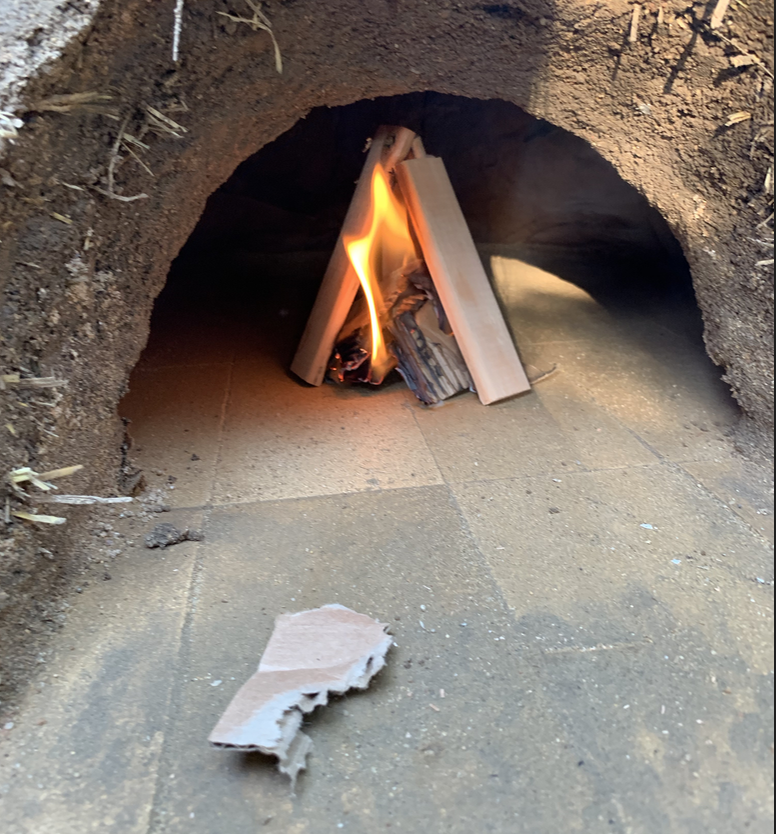
Now, at this point you have a functioning oven. You still need to add a final plaster layer to keep it safe from the elements but at this point once your oven has fully dried, you may cook in it. TIP: once your oven is to this point, you will build a couple SMALL test fires that will help dry the oven from the inside and fully cure it. If you build a large fire right away before it dries, you may cause cracks from the excessive heat. You may also have a heard time starting your fire if it’s moist on the inside of the oven still. Once it has properly cured, making a fire and using your oven will be something you will perfect as you use it more. Every oven is slightly different in there way it performs but my oven takes about two hours to fully heat up where I cook pizzas at about 700-800 degree Fahrenheit. Once the fire has died down and the oven has cooled off you can do things like bake and roast meats or vegetables. The possibilities are endless and cooking with fire is something incredibly ancestral. Having a drink and tending to a fire is very satisfying and fire adds different flavors and elements to meals that is impossible to create in a standard oven.
Final Notes:
As you enjoy your oven, you may find it has some surface cracks or things that need maintenance. It is as simple as getting the area wet and rubbing the two surfaces back together for small cracks. Or for larger cracks, simply make a little cob and smash it in the void you are trying to fill and let it dry. You will need to cover your oven with a small awning or roof or a bbq grill cover until you can make your lime plaster which will make it weather proof. Do not add cement plaster to a cob oven as the cob and lime plaster is breathable and will expel moisture within its walls. Using cement as an outside barrier could create moisture built up and cause your walls to crumble internally over time. Also, random fact Lime plaster is technically carbon neutral compared to cement which makes 1.5 lbs of emissions for every Lb of cement made.
I hope you enjoyed this basic Boom DIY on how to build a cob oven. Now with this information here , I hope you feel inspired to build your own earthen oven. Please send me a DM @theboomstead if you have any questions about Cob oven Builds or if you would like to have us help you build your own cob oven in your location. Working and building with cob is just one of the many ways to start bringing yourself closer to nature and adding skills that increase what you can offer to your community and the world around you.
@guymitchelljr