
How to make sourdough bread and the OG country loaf
A Boom DIY: How to Make a traditional Sourdough Country Loaf
Hey everyone, Today I wanted to talk about making your own loaf of sourdough bread at home. Since I learned how to make my own bread without using instant yeast, I automatically could taste the difference and was far better than anything you can buy at the store.
FYI: A Sourdough Country loaf is not an enriched bread meaning it doesn’t have eggs or butter in it so it’s not a sweet dough, but you can add things to the bread to make different combinations from savory to sweet.
If you don’t know the difference between bread made from instant yeast and sourdough fermentation check out our other blog that discusses the differences and the benefits of why sourdough is better tasting and better for you.

For the bread I make, I use the recipe from the amazing book Tartine. Tartine is a bakery in San Francisco and they make amazing sourdough among other breads. Sourdough can be used to make just about anything not just loaves of bread so you can get as creative as you want when baking with sourdough for making dough for things like pizza, calzones, ciabatta or even cinnamon rolls. For this recipe you will obviously need a sourdough starter. If you don’t have one you can purchase one on-line, get some from a friend who already has one, or you can make one yourself. If you decide to make one yourself, it will take about a week before its active enough to use so keep that in mind.
Like most people, I have a pretty busy schedule so this recipe is based on making the dough the night before when I’m around long enough to tend to it and then bake the next morning. This recipe is just a standard sourdough loaf, so it just has three basic ingredients, water, flour, salt, and starter, which is just water and flour. This recipe I added cherry tomatoes with basil, and herbs from the garden. You can add anything you desire when making your loaves but I honestly love the simplicity of the basic loaf with grass fed butter spread on top.

The Morning Before Baking: I remove my starter out of the fridge and place it on the counter to feed it. You can leave your starter on the counter overnight the night before to have it come to room temperature but I find it works out fine just taking it directly from the fridge the morning before baking. Mix your starter incorporating everything together and take out about a half cup to a cups worth and add it to a new jar to make your leaven. To your leaven, you will feed it 150 grams of bread flour and 150 grams of water. All purpose flour will work as well but bread flour has a higher protein content that helps your starter be more active. Mix well incorporating until there is no dry ingredients and keep covered on the counter for the day as it will have time to feed and your leaven should double in size during this time. After 4-8 hours, your leaven should be ready to use. If you are unsure, you can do the “float test” which is simply taking a small dollop of the leaven and dropping it in water. If it floats, it is ready, if it sinks simply give it more time or dump most of the leaven out and feed it again with the same ratio as it wasn’t active enough the first time when you fed it.
Many recipes for bread are based on using 1000 grams of flour. This makes it simple when doing math when figuring your hydration you want for your bread. The hydration level is the ratio of flour to water. The more water in the mix, the more tacky and difficult it will be to work with later on but the less dense the final loaf should be. This recipe is for a 70% hydration dough and makes enough for two large loaves.
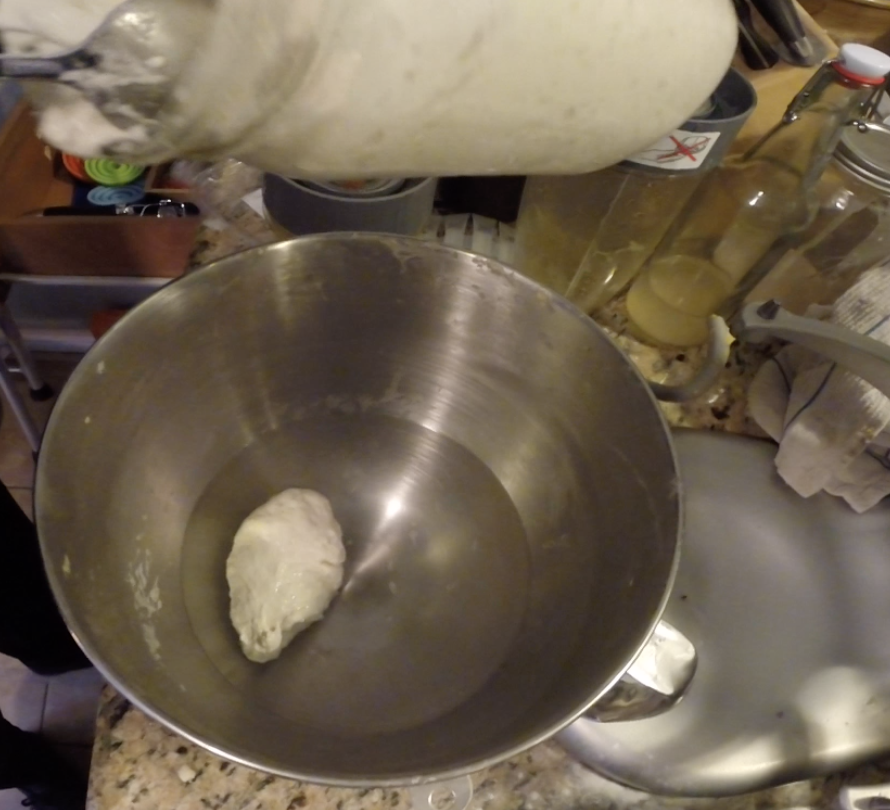
Auto-lease: With your bowl ready and your leaven passing the float test, pour 700 grams of water and to that add 200 grams of your leaven. Give it a little mix to incorporate the leaven and the water and then add 1000 grams of flour. With this you can use whatever flour you want but you will get slightly different results from using different types of flour and flour ratios but dont worry they are all equally delicious . I use 850 grams of bread flour and 150 grams of all purpose flour. Mix well incorporating all dry ingredients. Cover your bowl and let sit for 30 mins. This 30 mins gives time for the glutens and the flour to hydrate which helps with the development of the structure of the bread.
After waiting 30 mins uncover your bowl and add 16 grams of salt and 50 grams of water. With your fingers, press into the dough pushing the salt and water mixture into the dough. You should see a change in the look of the dough as it should seem smoother and have a shine to the outside surface. Work the dough for a few minutes and then cover it again and wait 30 mins. Moving forward, you will do a series of folds on the bread which will help develop the glutens making the dough extremely elastic and making for an airy finished loaf. I usually do folds every half hour for 2-3 hours before finally shaping my loaves.
First Fold and bulk fermentaion: After you wait 30 minutes for the autolease period and 30 mins after you added your salt and water uncover your bread and you will do your first fold. This is when you can add additional ingredients you want in your final bread as the folding process will incorporate the ingredients. Take one hand and grab an outer edge of the dough and stretch it up towards you and fold the dough over itself. Turn your bowl 45 degrees and do this again until you have gone around the bowl 360 degrees folding the dough 4-6 times. Cover your dough and wait 30 minutes that’s it! You will repeat this process 4-6 times based on how long you are around but the more folds you do will enhance the final product so your patience does pay off.
Pre-shaping: Once you Fold your dough one final time during the bulk fermentation, place it on a cutting board or clean countertop. Take a bench scraper and cut the dough in half creating two equal sizes of dough. Now you will pre-shape the dough and let it rest covered for your final 30 mins before shaping the final loaves. You can use the slap and fold method for preshaping which involves taking the dough with two hands and raising it up from the workspace so it start to stretch. Take the bottom end of the dough and slap in on the workspace and fold the dough in you hands over itself. Rotate your hands and grab the dough at a 90 degree angle and lift the dough and repeat the slap and fold technique for a few minutes slapping one end of the dough against your work surface while stretching the dough and folding it over itself again. Use your bench scraper and sliding the scrapper towards you to tuck the bottom of the dough under itself and go around the dough making a circular dough form. Do this for the second dough and cover them with a towel for the final 30 minute resting period. This step may seem tricky at first but will get easier. Don’t be afraid of hurting the dough as the more decisive your movements, the less sticky it should be. Try to resist using any additional flour during this process. You can slightly wet for fingers if you want to help your fingers from sticking while working the dough.
Final shape: Uncover your preshaped loaves and its time to do the process of the final shape and placing it in the proof basket to slow proof overnight. This process can be done a few different ways but you essentially will be doing a series of folds with the dough shaping it so when complete has as smooth top surface and the seam side down on the work space. The purpose of the final shape is to build tension on the dough which will help it keep its shape and help create rise when the dough is baking. Before placing you final shaped doughs, make sure your proof basket is well floured so it doesn’t still when you go to bake it the next day. Take your preshaped dough and using your bench scraper, remove it from the workspace and flip it so what was the top is now face down on the work table. Using your fingers stretch out the dough creating a rectangle shape. From here take the right side and fold it over on itself ⅓. Take the left portion of dough and fold in ⅓ over the previous fold. Now take the bottom of the dough and fold it up ⅓ on itself, then take your hands and roll the remaining ⅓ of dough on itself trying to create tension in the dough. At this point you have shaped the bread and i use my scraper to scrape the side in on themselves creating a circular form. Make sure your proof basket is floured liberally so the dough doesn’t stick when removing it the next day. Take the loaf and place it with the top of the dough place face down in the proofing basket. Place your laves in the fright covered overnight until bake time.
Bake Time: The next morning when i wake up turn my oven on to 450 degrees F and place my cast iron pot with lid on inside the oven to preheat. It is important to make sure you preheat your Dutch oven before you use. Simply placing your dough into a room temperature Dutch oven and then placing in the oven will create a final bread that is more dense as it doesn’t have the initial lift when baking in a preheated Dutch oven. Note: you dont have to bake your bread in the Dutch oven but it does help it significantly in terms of baking a perfect evenly cooked loaf. Each loaf takes around 45 minutes to cook so if you have only one Dutch oven then you can plan about an hour and a half for both loaves.
Once your oven has come to temp carefully remove the pot from the oven and remove the lid. I lightly flour the bottom of the pan and take the proofing basket and flip it over into the pot so that the side of the dough that was face down in the basket is now face up in the Dutch oven. Take a sharp knife or razor blade and use it to score your bread. This will create a release point for your bread when its baking and rising as it doesn’t blowout the side. You can get creative with your scoring patterns to create what are little pieces of art on some loaves. This will take time in terms of seeing the cause and effect of how a cut in the dough turns out after baking. Once you have scored your loaf, place the lid back on and place it in the oven for 35 mins.
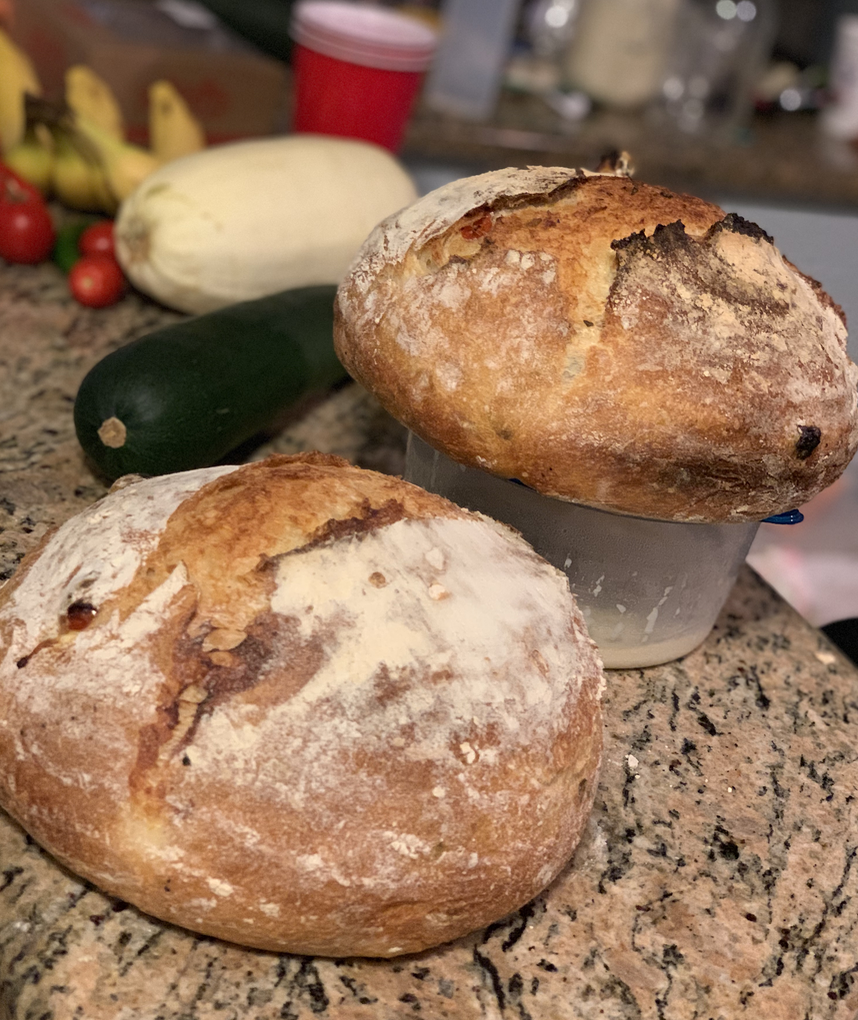
After 35 mins turn your oven up to 500 degrees F and bake for a final 10 minutes which will give the bread it’s finished color on the crust. Open your oven and remove the lid but be careful as there will be a lot of heat and steam being released when you initially open the oven. When removing the lid you should notice the bread has risen and maybe started to form what’s called the ear of the bread from the cut you made before baking. Your bread may look white and undercooked, so leave the lid off and keep it in your oven af 500 for an additional 10-12mins based on your preference. Note: when looking at your bread, dont be alarmed if your crust goes beyond golden brown. There may even be some burn marks if it is left in the oven uncovered for a little too long. This is totally ok, the bread inside is still perfectly fine and once sliced, i prefer the look and mouth feel of a crust that has been cooked more on the “done” side or about 16-18 minutes. At this point remove the pot and the bread and if you are uncertain about if your bread is done you can give it a check by knocking on the bottom of the bread. If it sounds hollow, that is an indicator it is done. Resist temptation to cut it right away and leave it to the side to cool down for about 45 mins.
Repeat the same steps if you have a second loaf. Reduce the oven temperature back down to 450 and place the second dough in the pot with the lid on for 35 mins again. By the end you should have two beautiful and more importantly, delicious tasting sourdough loaves that you made so now you can make it again and again.
When eating your sourdough try to resist the temptation of cutting into it right away as it is still cooking on the inside. If you are eating a loaf then next day you can place your bread in the oven or toaster before eating which will bring back the original feel of the bread from the day you baked it. Because there are no preservatives in this bread it may last about a week or so. Most likely you have eaten the bread well before that time though. Some of our favorite ways of eating our sour dough is fresh bread with grass fed butter. Hummus toast is another favorite with microgreens on top that we grow at home as well. Sandwiches, breakfast with eggs, jam/jelly, the list goes on and on. You will not have much problems figuring out how to eat the damn delicious bread. I hope you enjoyed this post and if you have any questions or interest on similar topics along with sustainability and permaculture, check out our other blogs on aboomlife.net. Thanks!!